Table of Contents
DSP-7-PA
Controller for amateur radio power amplifiers with large 7" TFT touch color display
and many measurement functions, sensors and WiFi web interface
Bootloader, flashing the STM32 firmware
Firmware Updates can be flashed into the DSP-7's microcontroller via a simple serial interface and a PC.
Connections:
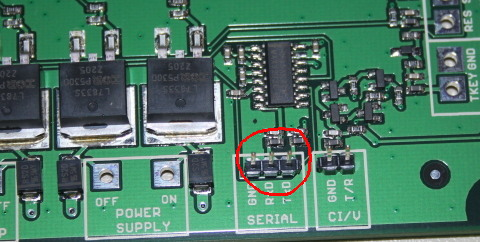
The board has an RS-232 serial interface which can be directly connected to a PC's serial port.
You can use a usual USB-serial converter cable which has a 9 pin connector.
Build a cable with this wiring:
| Funktion | Sub-D Connector Pin | connect to this PCB pin |
|---|---|---|
| Ground | 5 | GND |
| Data from PC to DSP-7 | 3 | RxD |
| Data from DSP-7 to PC | 2 | TxD |
Starting the built-in bootloader:
- switch OFF the 12v power supply
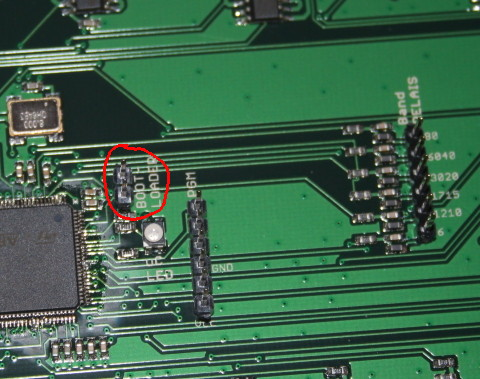
- short these two pins with a jumper
- switch ON the 12v power supply
The display will be off and dark. Now the bootloader is running and waiting for commands via the serial interface.
Bootloader Software:
The DSP-7 uses an ARM microcontroller, the STM32F427V. This controller can be flashed with a couple of tools for Windows and Linux.
Linux:
I have successfully tested the tool from: stm32flash.sourceforge.net
You can download and compile it by yourself, or stm32flash.zip is the compiled version.
Windows:
The serial flasher can be downloaded from the STM homepage:
look for the package: FLASHER-STM32
Using stm32flash under LINUX:
Reading the memory:
It is always a good idea to make a backup of the actual version. Start stm32flash in a terminal using this command line:
./stm32flash -r dsp7_`date +"%d%m%y"`.bin -S 0x08000000:0x100000 -b 57600 /dev/ttyUSB0
This will generate a binary file with the firmware, the pictures and all settings, so it is a complete backup. Be patient, this process takes some time.
Writing new firmware:
ATTENTION: flashing a new firmware will override your setting. Before flashing, write your settings on a piece of paper: the values in the calibration menu, the limits and system settings. After flashing the new firmware you have to enter these settings manually into the DSP-7. Also, it's a good idea to recalibrate the touch screen.
Flash it using this command line:
./stm32flash/stm32flash -w firmwarefilename.bin -S 0x08000000:0x100000 -v /dev/ttyUSB0
When you are done with reading or writing firmware then remove the jumper and switch off/on the DSP-7 controller.

